





High Performance Joint Compound Application: Tips for a Better Finish
Release time: September 24 2026
Views: 28
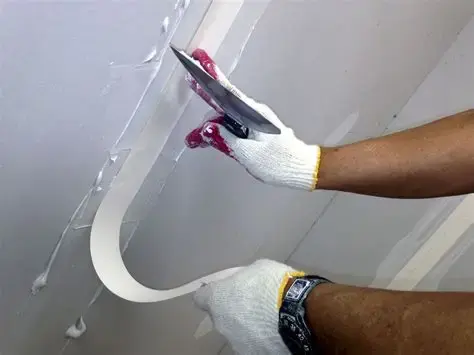
A high-performance joint compound can make drywall finishing faster and easier, but achieving a smooth, durable finish depends on more than choosing the right product. Surface preparation, mixing, tape embedding, application technique, and drying conditions all play a role in the final result.
For contractors and construction professionals, a consistent high performance joint compound application process can help reduce common problems such as joint cracking, tape lifting, uneven surfaces, and excessive sanding.
This guide walks through the main steps, from preparing the drywall to applying the final coat.
What Makes a Joint Compound High Performance?
Joint compound is used to fill and finish the joints between drywall panels, cover fastener heads, and create a smooth surface ready for decoration.
A high-performance product should offer a practical balance of adhesion, workability, strength, drying or setting performance, and finish quality. Depending on the project, contractors may also look for:
Good adhesion to drywall and joint tape
Smooth, consistent workability
Easy spreading and feathering
Low shrinkage
Good crack resistance
Consistent drying or setting
Easy sanding and finishing
Compatibility with the overall drywall finishing system
The right compound also depends on how it will be applied. Hand application, mechanical application, and large-area finishing may require different working characteristics.
If you are comparing products before a project, our guide on drywall taping compound covers some of the key factors to consider when choosing a suitable material.
How to Apply High Performance Joint Compound
Prepare the Drywall Surface
Start with a clean, stable substrate.
Make sure the drywall panels are properly installed and securely fastened. Remove dust, loose particles, grease, and other contaminants that could affect adhesion.
Inspect the joints and board edges before applying compound. If there are large gaps, damaged edges, or other defects, address them first rather than trying to correct them with a thick layer of joint compound.
Good surface preparation gives the compound a solid foundation and helps maintain consistent adhesion throughout the finishing process.
Mix the Joint Compound Properly
Always follow the manufacturer's recommended mixing procedure.
For powder-based joint compounds, add clean water gradually and mix until the material reaches a smooth, consistent consistency. Avoid adding more water than recommended simply to make the compound easier to spread. Excessive water can change the material's working and finishing characteristics.
The compound should be smooth enough to spread easily but firm enough to stay in place on the joint.
For larger projects, consistent mixing is particularly important. Keeping the mixing ratio and procedure consistent from batch to batch can help maintain more predictable application performance.
Apply the First Coat and Embed the Tape
The first coat provides the foundation for the joint.
Apply an even layer of compound along the drywall joint, then center the joint tape over it. Press the tape firmly into the wet compound using a taping knife.
Work along the joint to remove excess compound and air pockets while making sure the tape remains fully embedded.
Avoid trying to build up too much material in a single pass. The goal is to achieve good contact between the tape, compound, and drywall without leaving an unnecessarily thick layer.
Keep the blade clean as you work. Dried compound or debris on the knife can leave scratches and make it harder to achieve a clean finish.
Apply the Second Coat
Allow the first coat to dry or set according to the product instructions before moving on to the second coat.
At this stage, use a wider knife to apply compound over the joint and extend it beyond the edges of the tape. Feather the edges gradually so that the joint transitions smoothly into the surrounding drywall.
This wider application helps minimize the visible buildup at the center of the joint.
Avoid applying too much pressure at the edges. The aim is to leave enough compound over the joint while creating a thin, smooth transition on both sides.
Apply the Finish Coat
The final coat is primarily about surface quality.
Apply a thin layer over the joint and extend the feathered edges slightly further. Keep the application as even as possible and avoid leaving heavy ridges or excess material.
Once the compound has completely dried or set, inspect the surface under good lighting. Lightly sand any remaining ridges or imperfections as needed.
A product with good spreadability and sanding characteristics can make this stage considerably easier, particularly when finishing a large number of joints.
How to Improve Application Efficiency
For commercial and large-scale construction projects, finishing quality is only one part of the equation. Application speed, material consumption, and labor requirements can also have a significant impact on project costs.
A few practical considerations can help improve efficiency.
Choose the Right Compound for the Job
Different stages of drywall finishing can require different material characteristics.
A taping compound needs to provide reliable adhesion and support proper tape embedding, while a finishing compound may place greater emphasis on smooth spreading and easy sanding.
Using a product that matches the intended application can make the finishing process more predictable.
Match the Product to the Application Method
The way a compound is applied can affect the consistency and efficiency of the work.
If you are using mechanical equipment or applying compound over a large area, check that the product is suitable for the intended application method before starting. Material consistency and working time should be compatible with the equipment and installation process.
Control Site Conditions
Temperature, humidity, ventilation, substrate absorption, and application thickness can all influence drying and setting.
Avoid rushing the next coat simply to shorten the schedule. Applying another layer before the previous coat has adequately dried or set can lead to finishing problems later.
Keep Tools Clean
Clean knives, pans, and other application tools help maintain a smoother surface.
Even small pieces of dried compound can leave marks in a fresh coat, creating additional sanding work. Cleaning tools regularly is a simple way to keep application more consistent.
Build the Joint in Controlled Layers
Trying to achieve the finished surface in one heavy application can create unnecessary problems.
Applying several controlled coats and gradually widening the feathered area allows the joint to blend more naturally into the surrounding drywall. It can also reduce the amount of sanding required at the end of the process.
Common Problems During Joint Compound Application
Even a high-performance product can produce poor results if the material or application process is not properly controlled.
Tape Lifting
Tape lifting can occur when there is not enough compound beneath the tape, the substrate is poorly prepared, or the tape is not properly embedded.
Apply sufficient compound beneath the tape and use a taping knife to press it firmly into place. Avoid removing so much compound that the tape loses proper contact with the joint.
Joint Cracking
Cracks may be associated with movement in the joint, substrate conditions, insufficient reinforcement, excessive shrinkage, or an unsuitable application process.
For this reason, joint compound should be considered as part of the overall drywall finishing system rather than as a standalone material.
Uneven Joints
Visible ridges or raised joints are often caused by excessive compound, inconsistent pressure, or insufficient feathering.
Applying thinner coats and gradually extending the edges of each coat can help create a smoother transition.
Excessive Sanding
If a large amount of sanding is required, the problem may have started during application.
Heavy application, uneven edges, and poor feathering can all increase sanding requirements. A compound with good workability and finishing characteristics can make it easier to achieve the desired surface with less correction work.
Consider the Complete Drywall Finishing System
Good drywall finishing depends on how the different materials and application stages work together.
The substrate, joint tape, joint compound, finishing material, application tools, and site conditions all influence the final surface.
For this reason, choosing a joint compound based only on its price per bag may not give you a complete picture of its value. Application speed, material consumption, labor, sanding requirements, and finishing quality can all affect the total project cost.
LONZONE provides building material solutions covering mortar, gypsum-based products, ALC wall panels, and related construction applications. If you are looking for a coordinated approach to drywall finishing, you can learn more about our drywall finishing solution.
Final Thoughts
Successful high performance joint compound application starts with the right product but depends just as much on proper installation.
Prepare the drywall carefully, mix the compound according to the manufacturer's instructions, embed the tape properly, and build the joint with controlled coats. Give each layer enough time to dry or set, then finish the surface with careful feathering and light sanding.
For professional projects, it is also worth looking beyond the compound itself. A well-matched drywall finishing system can help improve consistency, reduce rework, and deliver a smoother surface from the first coat through final finishing.


