





How to Apply Base Coat: A Practical Guide for a Smooth Wall Finish
Release time: September 23 2026
Views: 33
A smooth, durable wall finish starts long before the final coat of paint. When working with plasterboard, drywall, or other compatible wall systems, applying the base coat correctly is essential for creating strong joints and a seamless surface.
The process may seem straightforward, but small mistakes in surface preparation, mixing, tape application, or drying can lead to visible joints, cracking, or unnecessary sanding later on.
So, how do you apply base coat properly? This guide walks through the process from surface preparation to the final finish and covers some of the most common application mistakes to avoid.
What Is Base Coat?
Base coat is a jointing compound used to build and reinforce joints as part of a multi-coat finishing system. In a typical three-coat system, it is used for the first coat to embed jointing tape and for the second coat to build up and widen the joint.
LONZONE Base Coat is a setting-type jointing compound supplied as a powder and mixed with water before application. It is designed for strong tape adhesion and joint strength and can be applied by hand or with suitable mechanical equipment.
If you are looking for a complete finishing system rather than a single product, explore LONZONE's range of jointing compounds for different stages of joint treatment.
What You Need Before Applying Base Coat
Having the right tools and a properly prepared surface makes the application much easier. Depending on the project, you may need:
Base coat or compatible jointing compound
Clean water
A clean mixing bucket
Mixing paddle or suitable mixer
Jointing knife or finishing trowel
Jointing tape
Sanding tools
A brush or sponge for removing dust
Appropriate personal protective equipment
Before you start, make sure the substrate is clean, dry, stable, and free from dust, grease, loose particles, and other contaminants.
For plasterboard or drywall, check that the boards are securely fixed and that screw heads and joints are properly prepared. Any damaged areas should be repaired before the base coat is applied.
Step 1: Prepare the Surface
Good finishing begins with good preparation.
Start by removing dust and loose material from the joints. Check the board edges and fastener areas for anything that could interfere with the application. The surface does not need to be perfectly smooth at this stage, but it should be sound and clean.
Surface condition is particularly important because dust or contamination can reduce adhesion between the compound and the substrate.
If you are working with ALC panels, plaster, or another substrate rather than standard plasterboard, check the product specifications first. Different substrates can have different levels of absorption and movement, so a jointing compound designed for one system should not automatically be used on another.
Step 2: Mix the Base Coat
For a powder-based base coat, add clean water according to the manufacturer's recommended mixing ratio.
Mix thoroughly until the compound has a smooth, consistent texture without dry lumps. The goal is a material that is easy to spread while still providing enough body to build the joint.
Avoid adding extra water simply because a thinner mixture feels easier to apply. Too much water can change the compound's working characteristics and may affect its ability to build and hold the joint.
If the product requires a standing or maturation period after the initial mix, follow the manufacturer's instructions before remixing and applying it.
It is also important to consider the product's working time. With a setting-type compound, mix only as much material as you can comfortably use within the recommended working period.
Step 3: Apply the First Coat and Embed the Tape
The first coat is often referred to as the tape coat.
Apply an even layer of base coat over the joint using a jointing knife or trowel. The compound should cover the joint sufficiently to provide a good bed for the tape without creating excessive buildup.
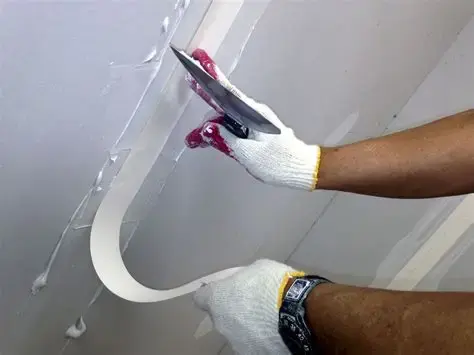
Place the jointing tape over the fresh compound and press it firmly into place.
Then run the knife along the tape to remove excess compound and push out any trapped air. Work from the center outward where appropriate, keeping the tape flat and fully embedded.
This step deserves particular attention. Poorly embedded tape or air pockets underneath it can become visible later and may contribute to cracking or other joint defects.
The aim is not to leave a thick layer of compound under the tape. Instead, focus on achieving consistent contact between the tape, compound, and substrate.
Step 4: Allow the First Coat to Set
Once the tape has been embedded, allow the first coat to set or dry according to the product instructions.
The actual time can vary depending on the type of compound, coat thickness, temperature, humidity, ventilation, and substrate conditions.
Do not rush into the next coat simply because the surface appears dry. The underlying material should be sufficiently set to support the next application.
For setting-type compounds, follow the manufacturer's recommended working and setting times rather than relying only on appearance.
Step 5: Apply the Second Coat
After the first coat has set, apply the second coat over the joint.
This coat has two main purposes: covering the tape and gradually building the joint so that it blends into the surrounding wall.
A wider knife or trowel can make this stage easier because it allows you to spread the compound farther beyond the joint and create a smoother transition.
Keep the application reasonably thin and even. It is usually easier to achieve a clean finish with several controlled coats than by trying to build the entire joint in one heavy application.
Pay particular attention to the edges. Feather them out gradually so the transition between the joint and the board becomes less noticeable as the compound dries.
Step 6: Inspect and Sand the Surface
Once the second coat has properly set or dried, inspect the joint under good lighting.
Look for raised edges, tool marks, pinholes, low spots, or areas where the tape is still visible. Small imperfections are much easier to correct at this stage than after painting.
Lightly sand high spots and rough edges as needed. Avoid aggressive sanding over the center of the joint, as excessive sanding can expose the tape or create unnecessary low spots.
After sanding, remove the dust before applying the next coat.
Step 7: Apply the Finishing Coat
In a typical three-coat finishing system, the final coat is used to create the smoothest possible transition between the joint and the surrounding surface.
A topping compound or another compatible finishing compound may be used for this stage, depending on the system and product specifications. LONZONE's jointing compound range is designed to support different stages of joint treatment, including base and finishing applications.
The final coat should generally be thinner and wider than the previous coat. Spread the material evenly, feather the edges, and avoid leaving heavy ridges that will require excessive sanding later.
Once the final coat has dried, lightly sand the surface and remove any remaining dust before applying primer and paint.
Common Base Coat Application Mistakes
Even with a suitable product, application technique can make a significant difference to the final result.
Applying the Compound Too Thickly
A common mistake is trying to finish the joint in one thick application. This can increase drying time and make sanding more difficult.
Better approach: build the joint gradually with thin, controlled coats.
Failing to Embed the Tape Properly
If the tape is not fully embedded or air is trapped underneath, the joint may become visible or develop problems later.
Better approach: press the tape firmly into the fresh compound and remove excess material with a jointing knife.
Adding Too Much Water
Over-thinning the compound may make it easier to spread, but it can also change its intended working properties.
Better approach: use the manufacturer's recommended water-to-powder ratio and adjust your technique rather than simply adding more water.
Sanding Too Much
More sanding does not necessarily mean a better finish. Excessive sanding can damage the joint and expose the tape.
Better approach: apply the compound evenly and use light sanding only where needed.
Using the Same Product on Every Substrate
Not every wall material behaves in the same way. Plasterboard, gypsum-based surfaces, ALC panels, and other construction substrates can have different absorption and movement characteristics.
Better approach: select a product and finishing system that are suitable for the specific substrate and follow the manufacturer's application recommendations.
Choosing the Right Base Coat
The right base coat depends on more than just the desired surface finish. Consider the substrate, application method, working time, finishing system, and conditions on site before selecting a product.
For manufacturers, distributors, and contractors working across different construction applications, product consistency is also important. Consistent raw materials, controlled formulations, and reliable production processes can make a noticeable difference when materials are used across larger projects.
LONZONE develops and manufactures building materials including mortar, gypsum-based products, ALC wall panels, jointing compounds, repair materials, and other dry-mix solutions. Its manufacturing process covers formulation development, testing, trial production, mass production, and quality control.
You can learn more about LONZONE's manufacturing capabilities if you are looking for a building-material manufacturer or OEM partner.
Final Thoughts
Applying base coat is not difficult, but getting a consistently smooth result requires attention to the details.
Start with a clean and suitable substrate, mix the compound correctly, embed the tape carefully, and build the joint with controlled coats rather than trying to do everything at once. Give each coat enough time to set or dry, and keep sanding to a minimum.
Most importantly, make sure the base coat is suitable for the substrate and the overall finishing system. When the right material is combined with proper preparation and application techniques, it becomes much easier to achieve strong joints and a smooth surface ready for decoration.
For more information on joint treatment materials and related building-material solutions, explore LONZONE's jointing compounds or learn more about its manufacturing capabilities.


